Restart cancelled go agents – Go Pipeline

I was tired of SSHing into almost 20 agents a day and running the same command to restart cancelled agents due to a pipeline that was taking too long or simply because someone cancelled a job. I then decided to write a very small Ruby script that would curl the Go agents API look for cancelled agents ssh into the box and restart this particular agent.

Well that is what the script does and you can find it here. On that github page I explain how to use it which should be very straightforward.

If you have any questions please post them here. Also note that I will be improving this script but PRs are always welcome.

This is a rather simple script but it saving me a lot of time and time is very important in our field.

Cheers

ABC = Always Be Coding!

ABC

What happens when you do Ember.run

Hi,

I have recently dedicated some time to learn what the Ember Run Loop, Backburner, was doing under the hood, I think if you want to understand why you should wrap your own logic within Ember.run() you should definitely read the source code.

So I will explain step-by-step what happens when you do Ember.run.

Ember creates a new instance of the Backburner object.


backburner = new Backburner(
['syc', 'actions', 'destroy'],
{
GUID_KEY: GUID_KEY,
sync: {
before: beginPropertyChanges,
after: endPropertyChanges
},
defaultQueue: 'actions',
onBegin: onBegin,
onEnd: onEnd,
onErrorTarget: Ember,
onErrorMethod: 'onerror'
}
);

view raw

ember-setup

hosted with ❤ by GitHub

new Backburner(queueNames, options)

Stores queueNames and options, if there is a defaultQueue it sets the first queue in the Array to be it.
It also creates properties such as instanceStack, and private ones, _debouncees, _throttlers and _timers and returns itself.

GUID_KEY
It helps to find a queue, I will be talking about this on another blogpost.

onBegin and onEnd callbacks.
Internally backburner has a begin method that calls the onBegin callback, if it exists, when it is done creating instances of deferredActionQueues with the queueNames ember has passed in as arguments.
It also has an end method defined that as you can guess calls the onEnd callback, if it exists, after it is done flushing the current instance queue.
Ember uses those two callbacks to set the currentRunLoop property.


function onBegin(current) {
run.currentRunLoop = current;
}
function onEnd(current, next) {
run.currentRunLoop = next;
}

view raw

onBegin_onEnd

hosted with ❤ by GitHub

The onBegin callback takes two arguments, in this case Ember is only interested in the currentInstance, which are currentInstance and previousInstance.

Ember defines and passes a onErrorTarget and onErrorMethod which backburner will use, if it exists, when it tries to flush your queues so that you can handle any errors.

It also passes some specific config for the sync queue as you have seen. So before backburners attemps to flush items in a queue, sync in this case, if the before callback exists it will apply it. The same thing happens for the after callback, it gets called once it is done flushing a queue.

Then Ember defines the run method:


export default run;
function run() {
return backburner.run.apply(backburner, arguments)
}

view raw

ember-run

hosted with ❤ by GitHub

When you call Ember.run you’re actually applying the run method in the backburner context and passing whatever arguments you have passed in. The apply here is similar to call the only difference is that apply allows you to pass your arguments as in an array type and call you neeed to pass every single argument comma-separated.

So far so good right?
Ok, now that you know all the setup let’s find out what happens when you do:


Ember.run(function() {
console.log('true');
});

The Backburner’s run method takes a target, a method and options as arguments. If the onError callback exists it will assign that to a local variable. It gets this information from the options property passed in when creating a new instance of the Backburner object.
Then it calls its internal begin method which is responsible for checking wether or not a previousInstance exists and if it does it pushes it onto the instanceStack list and then creates a completely new instance of DeferredActionQueues, which will talk about later, passing the queueNames and options and assigns it to be its currentInstance and the finally it calls the onBegin callback if it exists.

Let’s have a look at the DeferredActionQueues object.


function DeferredActionQueues(queueNames, options) {
var queues = this.queues = Object.create(null);
this.queueNames = queueNames || [];
this.options = options;
each(queueNames, function(queueName){
queues[queueName] = new Queue(queueName, options[queueName], options);
});
}

There is more to it and you can have a look at the source code here.

Got to love closures!! haha
Alright, as you can see it instantiates an “empty” object and assigns that to the queues local variable and it creates three properties, queues, queueNames and options. It then iterates over each key in queueNames array and creates uses its queueName value as the key to access that queue later on in the queues local variable, that points to an “empty” object, and the value is an instance of the Queue object. It finally returns and instance of its own which would be something like this:


DeferredActionQueues {queues: Object, queueNames: Array[3], options: Object}
// expanded
DeferredActionQueues {
queues: {
"actions": Queue,
"sync": Queue,
"destroy": Queue
},
queueNames: Array[ "actions", "sync", "destroy" ],
options: Object
}

view raw

return

hosted with ❤ by GitHub

Pretty good right? I hope you’re enjoying reading this because I enjoyed writing it as well as learning it.
Let’s have a look at the Queue object.


function Queue(name, options, globalOptions) {
this.name = name;
this.globalOptions = globalOptions;
this.options = options;
this._queue = [];
this.targetQueues = Object.create(null);
this._queueBeingFlushed = undefined;
}

view raw

queue

hosted with ❤ by GitHub

I guess that’s very straightforward and I do not have to explain that.

One of the key things to know is that it creates a new instance of the DeferredActionQueue passing the queueNames and options every time you call Ember.run. As you can see it here:


Ember.run.currentRunLoop
// undefined
Ember.run(function() {
console.log(Ember.run.currentRunLoop);
});
// DeferredActionQueues {queues: Object, queueNames: Array[6], options: Object, schedule: function, invoke: function…}
// You can run that in your browser and have a better look at it.

view raw

currentRunLoop

hosted with ❤ by GitHub

Let’s go back to the Backburner run method:


run: function(target, method, /* options, arguments */) {
var onError = getOnError(this.options);
this.begin();
if (!method) {
method = target;
target = null;
}
if (isString(method)){
method = target[method];
}
var args = slice.call(arguments, 2);
var didFinally = false;
if (onError){
try {
return method.apply(target, args);
} catch(error) {
onError(error);
} finally {
if (!didFinally) {
didFinally = true;
this.end();
}
}
} else {
try {
return method.apply(target, args);
} finally {
if (!didFinally) {
didFinally = true;
this.end();
}
}
}
}

I started explaining a little bit what it does above but I had to explain something else. So It checks whether or not method is present and if it isn’t it assigns target to method and target to be null. This is because you may have passed a function instead of a target, an object followed by a string which is the method to be called, so that later on when it applies that function it won’t error.
If onError is present it then applies the method and if an error occurs it will call the onError callback and pass whatever the error was. Finally it calls the end internal method.


end: function() {
var options = this.options;
var onEnd = options && options.ondEnd;
var currentInstance = this.currentInstance;
var nextInstance = null;
var finallyAlreadyCalled = false;
try {
currentInstance.flush();
} finally {
if (!finallyAlreadyCalled) {
finallyAlreadyCalled = true;
this.currentInstance = null;
if (this.instanceStack.length) {
nextInstance = this.instanceStack.pop();
this.currentInstance = nextInstance;
}
if (onEnd) {
onEnd(currentInstance, nextInstance)
}
}
}
}

view raw

backburner-end

hosted with ❤ by GitHub

As you can see it defines and sets some instance variables and it tries to flush the currentInstance, which is an instance of the DeferredActionQueues, and finally it assigns currentInstance to null and checks wether or not the instanceStack is 0. If it isn’t it then assigns the nextInstance, pops the last queue in the instanceStack, and the n assigns the currentInstance property to be this nextInstance. Finally it calls the onEnd callback passing it the currentInstance and the nextInstance.

Whenever the end backbone internal method calls currentInstance.flush() it sends a message, flush, to the the instance of the DeferredActionQueues object.
So what does flush do? Let’s have a look:


flush: function() {
var queues = this.queues;
var queueNames = this.queueNames;
var queueName, queue, queueItems, priorQueueNameIndex;
var queueNameIndex = 0;
var numberOfQueues = queueNames.length;
var options = this.options;
while(queueNameIndex < numberOfQueues) {
queueName = queueNames[queueNameIndex];
queue = queues[queueName];
var numberOfQueueItems = queue._queue.length;
if (numberOfQueueItems === 0) {
queueNameIndex++;
} else {
queue.flush(false, /* async */);
queueNameIndex = 0;
}
}
}

view raw

flush

hosted with ❤ by GitHub

It loops over the numberOfQueues and checks whether numberOfQueueItems is 0 and if it is the increments queueNameIndex which means it will go onto the next queue in this case the actions queue. This is very important because if you schedule something in the first queue inside the last queue but before you do that you schedule something else in the ‘actions’ queue it will flush what’s scheduled in the first queue and the the rest.


Ember.run(function() {
Ember.run.schedule('destroy', function() {
Ember.run.schedule('actions', function() { console.log('actions'); });
Ember.run.schedule('sync', function() { console.log('sync'); });
});
});
// sync
// actions
// WHILE LOOP ORDER
// Queue {name: "sync", globalOptions: Object, options: undefined, _queue: Array[0], targetQueues: Object…}
// numberOfQueueItems is 0
// Queue {name: "actions", globalOptions: Object, options: undefined, _queue: Array[0], targetQueues: Object…}
// numberOfQueueItems is 0
// Queue {name: "destroy", globalOptions: Object, options: undefined, _queue: Array[4], targetQueues: Object…}
// numberOfQueueItems is 4
// Queue {name: "sync", globalOptions: Object, options: undefined, _queue: Array[4], targetQueues: Object…}
// numberOfQueueItems is 4
// Queue {name: "sync", globalOptions: Object, options: undefined, _queue: Array[0], targetQueues: Object…}
// numberOfQueueItems is 0
// Queue {name: "actions", globalOptions: Object, options: undefined, _queue: Array[4], targetQueues: Object…}
// numberOfQueueItems is 4
// Queue {name: "sync", globalOptions: Object, options: undefined, _queue: Array[0], targetQueues: Object…}
// numberOfQueueItems is 0
// Queue {name: "actions", globalOptions: Object, options: undefined, _queue: Array[0], targetQueues: Object…}
// numberOfQueueItems is 0
// Queue {name: "destroy", globalOptions: Object, options: undefined, _queue: Array[0], targetQueues: Object…}
// numberOfQueueItems is 0

view raw

flush

hosted with ❤ by GitHub

I logged out the order that instances of Queue get flushed so that you can have a better understanding why it assigns queueNameIndex to 0 in order to start over again.

Finally it flushes everything that you have schedule in the queue. So let’s recap, DeferredActionQueues keeps track of instances of the queues you have passed in. The Queue object is the actual queue that stores everything you have scheduled. Let’s have a look at the Queue#flush.


flush: {
var queue = this._queue;
var length = queue.length;
if (length == 0) {
return;
}
var globalOptions = this.globalOptions;
var options = this.options;
var before = options && options.before;
var after = options && options.after;
var onError = globalOptions.onError || (globalOptions.onErrorTarget &&
globalOptions.onErrorTarget[globalOptions.onErrorMethod]);
var target, method, args, errorRecordedForStack;
var invoke = onError ? this.invokeWithOnError : this.invoke;
this.targetQueues = Object.create(null);
var queueItems = this._queueBeingFlushed = this._queue.slice();
this._queue = [];
if (before) {
before();
}
for (var i = 0; i < legnth; i += 4) {
target = queueItems[i];
method = queueItems[i+1];
args = queueItems[i+2];
errorRecordedForStack = queueItems[i+3];
if (isString(method)) {
invoke(target, method, args, onError, errorRecordedForStack);
}
}
if (after) {
after();
}
this._queueBeingFlushed = undefined;
if (sync !== false && this._queue.length > 0) {
// check if new items have been added
this.flush(true);
}
}

view raw

flush

hosted with ❤ by GitHub

This method is responsible for flushing everything that has been scheduled in the defined queues. It is very smart and once it is done “flushing” it then checks whether or not new items have been scheduled in a given queue by checking if sync !== false and queue.length is greater than 0.
So let’s have a look how they are testing this.


test("Queue#flush should be recursive if new items are added", function() {
expect(2);
var bb = new Backburner(['one']);
var count = 0;
bb.run(function(){
function increment() {
if (++count < 3) {
bb.schedule('one', increment);
}
if (count === 3) {
bb.schedule('one', increment);
}
}
increment();
equal(count, 1, 'should not have run yet');
bb.currentInstance.queues.one.flush();
equal(count, 4, 'should have run all scheduled methods, even ones added during flush');
});
});

NOTE: In the Queue#flush method before it invokes it checks wether or not the method is truthy this is because when you cancel a scheduled method and that method is in the queue that is being flushed it does not mess with that array all it does is nullify the method so that it won’t run it. I will write a blog post about cancelling scheduled methods.

As you can see during flush it assigns queueItems and this._queueBeingFlushed to a clone of this._queue and this._queue to an empty array. It then invokes (i.e executes all scheduled methods) what was scheduled in the queue. It runs the after callback if it was defined assigns this._queueBeingFlushed to undefined and in the test example when it was done flushing the queue it actually scheduled more methods in the queue, therefore this._queue now is greater than 0 and undefined is !== false so it will rerun, apply flush again, the queue passing true as its argument so that when it is done flushing again if new items have been scheduled it will do the same thing until this._queue is not greater than 0. This is quite a lot to take in feel free to ask me any question below.

Finally the invoke method, as you can see if onError callback exists it will invokeWithOnError otherwise it will just invoke. If something goes wrong whilst it is flushing a queue it will call this callback passing the error message onto it.

Queue#invokeWithOnError


invokeWithOnError: function(target, method, args, onError, errorRecordedForStack) {
try {
if (args && args.length > 0) {
method.apply(target, args);
} else {
method.call(target);
}
} catch(error) {
onError(error, errorRecordedForStack);
}
}

view raw

queue.rb

hosted with ❤ by GitHub

Queue#invoke


invoke: function(target, method, args, _, _errorRecordedForStack) {
if (args && args.length > 0) {
method.apply(target, args);
} else {
method.call(target);
}
}

view raw

queue.js

hosted with ❤ by GitHub

Alright, there you have it. I know it is quite a long post but I tried to cover as much as I could and I still think there are some stuff missing. Please do comment below if you think I should improve it in some way.

I hope you have enjoyed reading it, I will be writing more about Backburner so keep checking my blog.

Ember.run.once

Hi,

After diving into the micro-library,aka Backburner, that powers the Ember Run loop I decided to write a blogpost about it so that developers can have an idea of what it actually doing.

First of all you can find the source code for Ember.run here => ember.js/packages/ember-metal/run_loop.js.

Ember defines some callback functions before creating an instance of Backburner, such as:

onBegin => defines a currentRunLoop in the current instance of the backburner object and sets its to the currentInstance.
Backburner calls this callback whenever you create a new instance. This callback takes two arguments (currentInstance, previousInstance).

onEnd => Ember now sets the currentRunLoop to be the next instance which is returned by Backburner which is the last instance in the instanceStack that BackBurner keeps. This callback also takes two arguments (currentInstance, nextInstance).

It also sets the default Backburner queue to be the “actions” queue and the onErrorTarget to Ember itself and the onErrorMethod to “onerror” which is defined in Ember itself so when Backburner tries to flush it will check whether or not it should invoke, call the method passed in passing its target and arguments, with one error or not. It uses invokeWithOnError if an error occurs it will call the ‘onerror’ method defined before in the onErrorTarget which in this case is Ember itself.

You can see this snippet here: https://github.com/emberjs/ember.js/blob/master/packages/ember-metal/lib/run_loop.js#L22-L33

Great now we have an instance of the Backburner object ready to be used, let imagine the following scenario:

setNameOnPage: function(name) {
 this.$('name').val(name);
},
updateName: function() {
 setNameOnPage("Antonio");
 setNameOnPage("EmberRocks");
 setNameOnPage("Yehuda");
},

changeName: function() {
 Ember.run(function() {
  Ember.run.once(this.updateName);
 });
}.observe('name')

So every time “name” changes ember will run the changeName property which creates/joins a run loop and tells the run loop, backburner, to run the “updateName” function once. Ember.run.once sets the default queue to be the “actions” queue and call the backburner scheduleOnce method, which is an alias to deferOnce in the Backburner object. Every time you or ember calls “run.once” the only thing that backburner will change is the arguments and the stack which is an instance of the Error object if debug is true.

Ember Run loop uses a GUID(i.e Global Unique Identifier) which I will cover in another blogpost, as I do not fully understand what it does yet.

As you can see here: https://github.com/ebryn/backburner.js/blob/master/lib/backburner/queue.js#L43-L100

I hope this post gives you an idea on what the Ember Run Loop is doing, Please leave your feedback/corrections bellow.

Testing ember components with Ember-QUnit

In this blogpost I am going to show you how to test your components using ember and ember-qunit.
I am assuming that you are familiar with ember-cli as we’re going to be using it.

In this example my component name will be show-products.js under app/components/show-products.js and template is under app/templates/components/show-products.js.

So we have imported moduleForComponent which is an ember-qunit helper to load your component, show-products, for us. Once we have it defined we can then access the component using the this.subject() within the test function and we cat get/set values or send actions to it.

It also allows us to get the currentElement by doing: this.$()

One tricky bit is that the Ember Run Loop is disabled when testing your app so that is why we need to call it ourselves.


import Ember from "ember";
import { test, moduleForComponent } from "ember-qunit";
moduleForComponent("show-products");
test('should not show products for the first time', function() {
var component = this.subject();
equal(component.get('showingProducts'), false);
});
test('should show products when clicked on link', function() {
var component = this.subject();
Ember.run(function() {
component.send('toggleElement');
})
equal(component.get('showingProducts'), true)
});
test('shows one product', function() {
var component = this.subject();
Ember.run(function() {
component.set('products', [ 'Remote Control']);
component.send('toggleElement');
});
equal(this.$().find('ul li').length, 1)
});
test('shows multiple products', function() {
var component = this.subject();
Ember.run(function() {
component.set('products', [ 'Remote Control', 'AAA Battery']);
component.send('toggleElement');
});
equal(this.$().find('ul li').length, 2)
})


<p class="intro smaller">Products <a href="#">See all</a></p>
<div class="products">
{{#if showingProducts}}
<ul>
{{#each products}}
<li>{{.}}</li>
{{/each}}
</ul>
{{/if}}
</div>


import Ember from "ember";
export default Ember.Component.extend({
showingProducts: false,
toggleElement: function() {
this.toggleProperty('showingProducts');
}
});


{{show-products products=products}}

view raw

template.hbs

hosted with ❤ by GitHub

Also, as you may have noticed in the show-products.hbs template I have used {{.}} instead of this that is why Handlebars binds . to this for us.

That is it, very straight forward isn’t it?

Thanks

Toggle elements in EmberJS.

Hi there,

In this blogpost I will show you two ways of hiding and showing elements using EmberJS. If you do not know what EmberJS is please here about it here.

So let’s get started. I will be showing you how to do this in an efficient way in other words we won’t be creating a new instance of the show-todos component for every single todos. Instead we will be editing its state on the model.
This is good if you want to display more than 50 todos per page.

npm install ember-cli
ember new todos
cd todos

Add the following to your Router:

//app/router.js
Router.map(function() {
  this.route('todo', { path: '/' });
});

Create a template named todo.hbs.

//app/templates/todo.hbs
<h1>Showing todo list</h1>
{{show-todos action="todoToggler" todos=model.todos}}

So what’s happening above?
We are telling handlebars to look for a component named ‘show-todos’, Components follow a name convention such as name-here if you name your components without a dash you will have to register it manually as ember won’t know how to find it, and we also pass two parameters to it the first one is action and the second is todos. These params can be accessed within the component when it is rendered.

Create a template for the ‘show-todos’ component named show-todos.hbs

{{#each todo in todos}}
  {{#if todo.isNotHidden}}
    <p>{{todo.id}} - <button {{action 'toggleTodo' todo.id}}>Hide</button></p>
  {{else}}
    <p>{{todo.id}} - <button {{action 'toggleTodo' todo.id}}>Show</button></p>
  {{/if}}
{{/if}}

So remember I said the params we have passed in are accessible within the component’s template?
Above we are accessing the todos which points to all the todos that comes from the Controller that we defined.
We are looping through each todo and checking whether they are visible or not. Note that we show a different button name based on its state but we give it the same action name which is defined in the show-todos.js component and we also pass the todo id which will be used later on to find which component we should modify.

Create an Ember component named show-todos.js

//app/components/show-todos.js
import Ember from "ember";

export default Ember.Component.extend({
  actions: {
    toggleTodo: function(id) {
    this.sendAction('action', id);
  }
}
});

Now that’s kinda cool and tricky, Ember ‘sendAction’ knows how to send actions to objects using the ‘action=name…’ that you gave when you called the component from a view.(e.g {{show-todos action=’todoToggler’ ….}}).
It will send an action named todoToggler with an id as the parameter.

Create a todo controller:

//app/controllers/todo.js
import Ember from "ember";

export default Ember.Controller.extend({
  model: function() {
    return {
      [ { id: 1, isNotHidden: true }, { id: 2, isNotHidden: true } ]
    }
  },

  actions: {
    todoToggler: function(todo_id) {
      var todos = this.model.todos,
          todo = todos.findBy('id', todo_id);

      todos.removeObject(todo);
      todo.isNotHidden = todo.isNotHidden ? false : true;
      todos.addObject(todo);
      this.set('model.todos', todos.sortBy('id'));
    }
  }

});

We defined the data that we usually get from calling a model directly into the controller (i.e model property).
Whenever we click on a button defined in app/templates/components/show-todos.hbs it will be calling the action ‘toggleTodo’ that is defined in app/components/show-todos.js that will trigger another action which in this case is ‘todoToggler’ that we defined above in app/controllers/todo.js.
Whenever the todoToggler actions gets called it will fetch all the todos find the todo we want to modify using the todo.id that we passed in as a parameter when we triggered the ‘todoToggler’ from the show-todos component action and it will remove that todo from the todos list, reassign isNotHidden to true if it was false or vice versa, add the newly modified todo and sort by it’s ‘id’ property which will put the todo items in order and set ‘model.todos’ to be it.

So the way Ember works is that none of that will actually change anything on the view until the last bit gets executed and the it will re-render the view for us. If you want to know more about this have a look that the Ember run loop.

So whenever you click on the Show button it will change isNotHidden that is false to true and ember will render the template therefore showing that element.

That’s it for today, I will be posting another way of doing this which is a more expensive way of doing it.

Behaviour Driven Development with Sinatra + Cucumber, Capybara, and Rspec expectations

Hello all,

On this blog post we’re going to write a very simple flight api to see destinations.
My intention here is to guide, walk you through, on how to test, drive your code, using cucumber and others.

First of all, dependencies.

Make sure you have the following gem on your Gemfile.

source :rubygems
ruby "2.0.0"

gem "sinatra"
gem "sinatra-assetpack", "~> 0.3.2", require: "sinatra/assetpack"

group :test do
  gem "cucumber"
  gem "capybara"
  gem "capybara-webkit"
  gem "rspec-expectations"
end

Asumming you have relady run: bundle

Create a file in features/home_page.feature and open it up in your editor/ide of choice, I use vim.
Here we go now, we’re going to write out first cucumber feature. However what’s the definition of a feature or a scenario?

A cucumber feature is:

In cucumber, a feature is a high-level requirement expressed from the perspective of a person or another computer using
the system. Features play a role similar to that of user stories in XP.
source: The RSpec book

Or you can read this Feature Introduction

Great, I assume that you must know what cucumber features are by now.

Let’s write our first Acceptance test.
Before, make sure you have created a file under the dir features/support/env.rb

Feature: Displaying departures
  Given Paul is on our website
  And he wants to see a list of departures

Background:
  Given a Paul is on home page
  Scenario: List of departures
  Then he should see a list of departures

And now, we run it:

cucumber

You should an output like this:
cucumber_feature
What that means is cucumber telling us what we have to do next, this is the beauty of writing tests.
Once you’ve written it, if you follow the laws of TDD/BDD you will always now what the next step is and most important
when you are done with a feature/functionality.

Right, so now we have to implement those pending steps.
Create and open up a file under the dir feature/step_definitions/home_page.rb

I tend to copy and paste that output cucumber gives us, and then write our tests.
I also like writing a small DSL to enforce what we are testing rather than writing those methods that a testing framework provide.

Given(/^a Paul is on home page$/) do
  customer_is_on(:home_page)
end

Then(/^Paul should see a list of departures$/) do
  user_should_see_a( list: ".departures li", count: 3, text: /./ )
end

Let’s define a helper under the dir features/support/helpers.rb

module Helpers
  def customer_is_on(path)
    visit( path == :home_page ? "/" : path )
  end
  alias :are_on :customer_is_on

  def should_see_a(*args)
    attributes = args.first
    tag = attributes.delete(attributes.first[0])
    page.should have_css(tag, attributes)
  end

  def user_types_in(element, text)
    fill_in element, with: text
  end

end

World(Helpers)

What we just did was, we create a Ruby module, some methods and included it into  cucumber World using World method.
Whenever we write code like this it becomes easier to change, embrace change, and we do not have to hard-code a lot of stuff.
For example if we were to write it like so:

Then(/^Paul should see a list of departures$/) do
  %w{ New\ York Japan Paris }.each do |city|
     page.should have_content(city)
   end
end

What happens if we’d like to change those city names? we would have to come back to this test and hard-code it again.
What if we could write tests that still tests the behaviour but we do not have to hard-code a lot?

Awww_yeah

Yes we can :), With the help of capybara and our good Ruby skills plus our brains we can do so.
Let’s examine this snippet of code:

def should_see_a(*args)
  attributes = args.first
  tag = attributes.delete(attributes.first[0])
  page.should have_css(tag, attributes)
end

The good thing of doing this is that it enforces our tests to be more readable, we can reuse this method later on, and we can integrate this in
almost any context.

Okaay, let’s get this done.
What we do now? we run our tests again.

cucumber

What happens now? It fails, yeah this is the first step of TDD.
Now that we’re RED, we need to write just enough code to make our tests go GREEN and the RE FACTOR.

Create and open up file under root dir named app.rb

require 'sinatra'
require 'sinatra/assetpack'
require 'json'
class MyApp < Sinatra::Base
  register Sinatra::AssetPack
  assets do
    js :application, [ "/js/jquery-1.11.0.min.js", "/js/index.js" ]
  end

  get '/' do
    @departures = [1,2,3]
    erb :index
   end
end

Note that I have written some code to require our assets, css and js files, relying on the gem sinatra-assetpack.
What do we do next? We run our test suite again.

cucumber

And now it, capybara, complains that it can not find those elements we have told it to find.
So the next step is to write our view under the dir views/view.erb
Which you can check out here.

Great, we run our test suite again.

cucumber

, and
Fuck-Yeah-meme

We have our first test, user story, passing.
How awesome is that?

I think this is enough, there is a lot more I’d like to go through but time is limited.
If you like this little sinatra app, you can check this out here on Github, I have written another acceptance test, user story, that
tests when a user types in a name of a city to see that city’s destinations.
It uses Ajax to send this data to the server and updates the page showing destinations found or an error message.

Please do not hesitate to criticise or teach me if I have forgotten something or if you think you have a better way of doing this.


Git ignore files for certain a branch

Hi there!

I have recently run into an issue wher I had some files which I did not want to submit them to github
( i.e Rails initialisers ) and I came across this awesome feature git provides.

Given you have two branches, master and public
When you commit to both
Then you should not see private files in public branch
And you should see private files in branch master

How to accomplish that?

First of all remove root_dir/.gitignore
Then create two text files given any name you like in: root_dir/.git/info/


$ vim.nox .git/info/global

#Ignore bundler config.
/.bundle
# Ignore the default SQLite database.
/db/*.sqlite3
/db/*.sqlite3-journal
# Ignore all logfiles and tempfiles.
/log/*.log
/tmp
*swp

This will be your gitignore that is going to be used in any branch.


$ vim.nox .git/info/private

/config/initializers/**/*

This should be what you want to be private. ( i.e not to submit those files to github )

And finally you just have to add global_ignore to be used in all branches and private_files
to branches that you want to be private.

</code>
$ vim.nox .git/config

# To add global_ignore

[ core]
excludesfile = +info/global_ignore

# To add private_files

[remote "origin"]
excludesfile = +info/private_files

[ branch "public"]
excludesfile = +info/private_files

Rationale:

[ remote/branch “branch_name”] might already be defined in your .git/config
if not you just have to add it yourself. I belive this is self explanatory.

Want to learn more?
Here is git docs http://git-scm.com/docs/gitignore.

ABC = Always Be Coding

Polymorphism and Traffic Lights

Hi,

In this blog post I going to share with you how I understood
the concept of Polymorphism. I will not use complicated
technical language, as I want to make it fairly simple to understand.

First, what does the word polymorphism mean?
Poly -> More than one, multiple, many. ( e.g a polygon is many-sided )

20-sided_dice-thumb-430x433-119154

Morph -> Change or form. ( Morpheus the Greek God of dreams able to take any form ).

morpheus-chair

Nope, not this one but this:
morpheus-iris-01

Cool, with the help of this images your brain will assimilate this much faster and you probably will
never forget what these two words mean.

Imagine you’re going back home after a lovely day at work and
that you are an instance of object Person.
traffic_lights

As you can see on the image above, there are different objects (i.e people )
which are responding to the messages being sent from the TrafficLight object.
It does not matter if the objects have a green colour neither if they’re naked or not feeling well.What really matters is that each object responds to the message that TrafficLight object is sending out.

How do they respond to these messages ?
By agreeing on a protocol which in this case is:
See Message Passing

  • Do not move when message is “Red“.
  • Move forwards when message is “Green“.
  • Stop when message is “Orange“.

I do have to say that bugs can occur and some objects will behave differently, if they have
been overridden at some stage during the program execution ( i.e drunk driving ).
Some of them may be a work in progress object that they will probably stall out their vehicle.

Rationale:

Traffic light object sends a message to its known objects ( i.e people waiting by )
These objects know that if traffic light object sends a message saying
Red” they should respond to it by waiting until traffic light object sends them a message
saying “Green“.
How are they going to wait? That does not concern TrafficLight object, some of them might wait by looking around, or thinking about their lives. Once the “Green
message is received from TrafficLight object they know that they’re allowed to move.

I hope you understood what Polymorphism is in Computer Science in a less complicated
explanation.

ABC = Always Be Coding

Simulate a Shell in Vim| Run your test suite inside Vim. GNU/Screen || Tmux

Hi there!

Have you noticed that you keep dancing between tabs on your terminal window?
If you happen to do TDD/BDD this can be quite tedious plus you have that feeling of
“I am repeating myself”. Hackers/Programmers/Bakers do not like repeating themselves over and over again ( unless they’re mastering at something ).

Most of my time I use CLI rather GUI, therefore it can be quite painful to open two shell sessions and have to be hitting Alt + F1/ F2 all the time to see the results of my tests.
I also had to be typing :w (save in VimL) all the time to save the feature I am working on.

This tutorial aims to cover Minitest ( Minitest is awesome ). However it can be used for
any other testing framework that are out there. ( RSpec, Bacon, Shoulda, etc…)

Let’s get started. We’re going to use Watchr in order to monitor our files ( i.e every time we save a file watchr runs our test suite for us ). I have had some issues while using
autotest therefore we’re not using it.
However one can use autotest instead of watchr to get this working.

So what do we need?
Assuming you’re using Vim you just need to install GNU/Screen or Tmux and this vim plugin http://www.vim.org/scripts/script.php?script_id=2711 written by Eric Van Dewoestine.( Make sure you say thank you to him. )

A little bit about GNU Screen and Tmux. ( You can read them, I’ll wait. )
GNU/Screen:
http://www.gnu.org/software/screen/

Tmux:
http://tmux.sourceforge.net/

Installation:

Let’s assume you’re using GNU/Linux as your OS, GNU/Screen as your terminal multiplexer, Minitest as your testing framework, and Watchr to automate the process of running tests.

1 – Install GNU/Screen or Tmux
sudo apt-get update
sudo apt-get install screen

2 – Install Vim Screen plugin mentioned above.
Follow the installation instructions on the Vim Screen plugin webpage.

3 – Install autotest , watchr or any other tool to automate your tests.
gem install watchr
gem install minitest

4 – Configure you tests to run automatically.
Here is my watchr script to run my test suite.
( Fiddle with it and use it the way it suits you better )

#-*- ruby -*-
#
# MAKE SURE YOU CHANGE THE YOUR TESTS DIR
# AND YOUR LIB DIR
#
# Run me with:
# $ watchr specs.watchr
# --------------------------------------------------
# Rules
# --------------------------------------------------
watch('^CHANGE_TO_YOUR_TESTS_DIR/.*_spec\.rb') { |m| ruby m[0] }
watch('^CHANGE_TO_YOUR_LIB_DIR/(.*)\.rb') { |m| ruby "CHANGE_TO_YOUR_TESTS_DIR/#{m[1]}_spec.rb" }
watch('^CHANGE_TO_YOUR_TESTS_DIR/minitest_helper\.rb') { ruby tests }
# --------------------------------------------------
# Signal Handling
# --------------------------------------------------
Signal.trap('QUIT') { ruby tests } # Ctrl-\
Signal.trap('INT' ) { abort("\n") } # Ctrl-C
# --------------------------------------------------
# Helpers
# --------------------------------------------------
def ruby(*paths)
run "ruby #{gem_opt} -I.:CHANGE_TO_YOUR_LIB_DIR:.:CHANGE_TO_YOUR_TESTS_DIR -e'%w( #{paths.flatten.join(' ')} ).each {|p| require p }'"
end
def tests
Dir['CHANGE_TO_YOUR_TESTS_DIR/**/*_spec.rb'] - ['CHANGE_TO_YOUR_TESTS_DIR/ANY_HELPER_NAME.rb']
end
def run( cmd )
puts cmd
system cmd
end
def gem_opt
defined?(Gem) ? "-rubygems" : ""
end
view raw specs.watchr hosted with ❤ by GitHub

5 – Create vim key maps
This can be a little intimidating to whomever is new to VimL.
( i.e Vim Language ). I’d rather read these first.

:help i_ctr
:help key-notation
:help map
Here are my vim’s key maps

6 – USE IT && LOVE IT && SHARE IT?

Okay mummy, I hope I made your life a little bit easier.
Remember ABC = Always Be Coding.

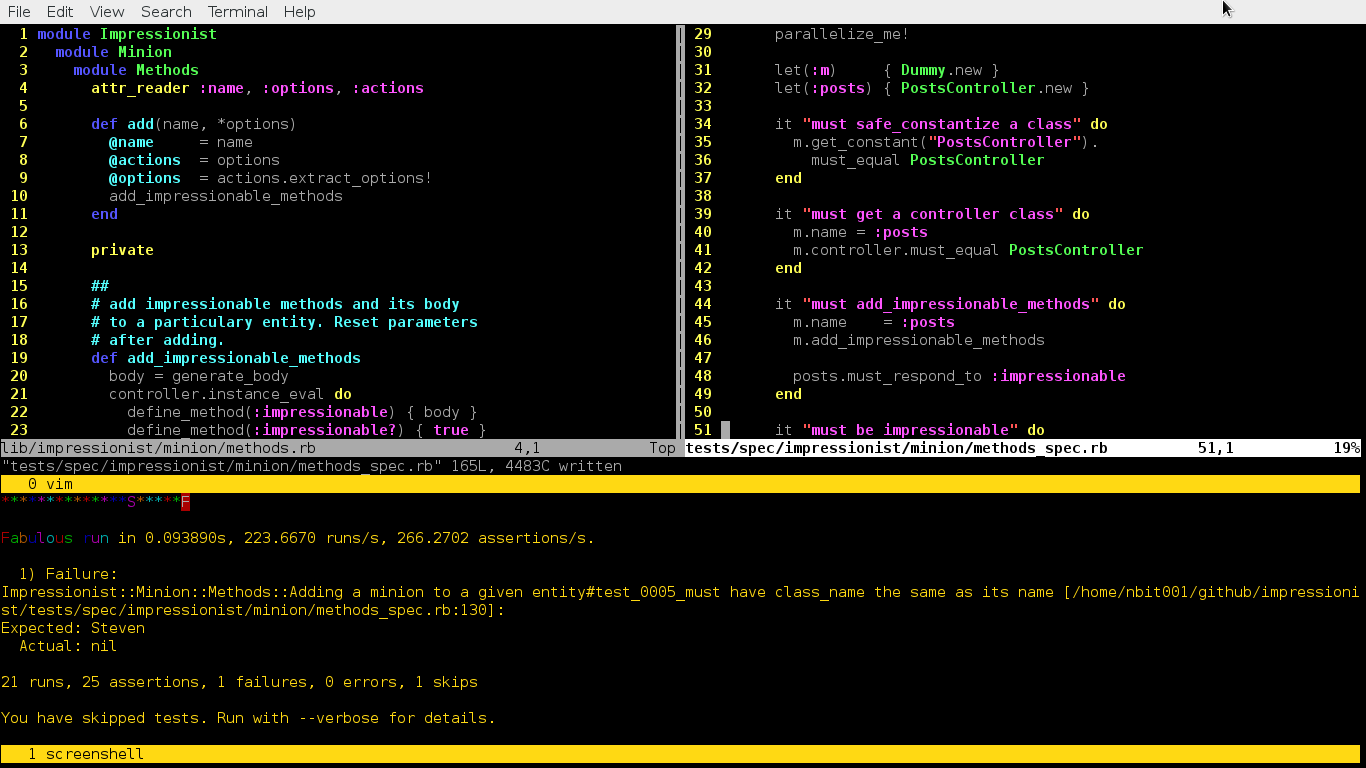
Ahhh, screenshot of the thingy working:
Tcharan: ( BTW that’s on GUI )

Rails 4: Invalid route name, already in use

If you’re going through this issue using devise with rails 4, it could be that you’re defined the same route name(i.e as: my_coolest_name) twice.

Here is an issue on github regarding devise.
https://github.com/plataformatec/devise/issues/2393.

If you’re interested in knowing more about this issue you can see where it comes from, In fact it is not an issue, but an ArgumentError when a clashing named route is defined.
An issue that @trevorturk went through and wrote a patch for it.

What could case this issue is:

“`
devise_for :users
devise_for :users, controllers: { registrations: “users/registrations” }
“`
or

“`
get ‘one’ => ‘test#example’, as: :example
get ‘two’ => ‘test#example’, as: :example
“`

You’re basically pointing to one end point from different paths.
Therefore it rais this exception:

Invalid route name, already in use: 'new_user_session' 
You may have defined two routes with the same name using the `:as` option, or you may be overriding a route already defined by a resource with the same naming. For the latter, you can restrict the routes created with `resources` as explained here: 
http://guides.rubyonrails.org/routing.html#restricting-the-routes-created